Today I wanted to share the projects we made last week at my monthly stamp camp. I know, I should be showing you projects from the new Holiday Catalog, and I promise, those are coming. But since I couldn't have the group use any of those products before the catalog goes live on Sept 1st, we made these instead. Here they are:
I have to admit, this first card was not my design at all. Sometimes the mojo just doesn't work well, and this was one of those days. As a Stampin' Up! demonstrator, we receive a quarterly magazine that's full of inspiration. This card came from the July/August issue. I changed it up just a bit, but the basics are there. We used the Friendly Wishes and Over the Rainbow stamp sets, 4 of the new In Color inks, 2 of the new dreamy In Color Dotted Lace Trim, as well as the In Color Blossom Accents. The sentiment was colored using the In Color Markers, and cut out with the Lots of Labels Framelits.
Here we used the Sprinkles of Life stamp set. I love the new Tree Builder punch. That's what we used to punch out this ice cream on the cone here. We fussy cut the cone and popped it up on a piece of Cherry On Top designer series paper stack, backed by a piece of Cucumber Crush. The base is Watermelon Wonder. We used a 2 way glue pen to add some confetti, punched out from the Confetti Stars Border Punch, and sprinkled a little Dazzling Diamonds on top. I love the drips of ice cream in chocolate and vanilla.
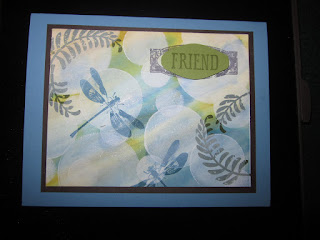
This was a fun card! I always wanted to try the Bokeh technique. We sponged Crushed Curry, Old Olive and Marina Mist on white card stock. Using an acetate mask I made out of punched circles of different sizes, we used a sponge dauber and applied white craft ink to all the circles, ensuring we overlapped some of them. We had to heat set it because craft ink takes time to dry. After it was dry, we then stamped our images from the Awesomely Artistic stamp set. I love this set! It has so many wonderful images. We used Mossy Meadow for the ferns, Marina Mist for the dragonflies, and Early Expresso for the oval stamp where the "friend" is. We used the Bow Builder punch to cut out the "friend" and just snipped off the ends so it would fit into the oval image from the stamp set.
Another great set in the annual catalog is Garden in Bloom. Paired with a strip of English Garden designer paper for the striped piece and the banner, these two products were made for each other. A quick punch using the Triple Banner punch makes great banner strips easily. We used a piece of Night of Navy Seam Binding and some Regals Designer buttons, tied with pieces of Whisper White Baker's Twine. Ink colors were Night of Navy, Hello Honey, Pear Pizzaz.
Our final projects were two of these gift card / money holders. We used paper from the Go Wild and Pretty Petals Designer Paper stacks, as well as the In Color 12 x 12 paper packs. These are so easy to make. Cut your paper to 5-1/2 x 5-1/2 and using the Envelope Punch board, place the left edge of your paper at the 2-3/8 mark. Punch and score. Continue to line up each scored line with the little tip on the board, punch and score. Do not score on the last turn; just punch only. Adhere and decorate and you're done! Easy peasy!
I hope you like my projects today. We really had a great time learning the bokeh technique and making these other projects. If you don't already have a demonstrator, contact me today and I'll be sure to send you a catalog, as well as the new Holiday Catalog, that goes lives on September 1st. Trust me, you WANT this catalog! I say this every year, but it's the best holiday catalog so far! They keep getting better and better. And, if you're local and want to attend my monthly stamp camps, contact me today. Our next one is September 19, and we will be using all new items from the holiday catalog. Have a great day and thanks for stopping by!


.jpg)
WOW!! looks like you were really busy making this awesome cards. Love all of them but my favorite is the one with the Dragon Flies and the Bokeh technique, it's just to beautiful.
ReplyDeleteThank you for sharing.
Hugs.